We're Social:                             Member Login

Mod PageSpeed - How to Turn Off

By default, we add Mod PageSpeed to all servers. This Module is provided by Google and is chuck full of goodies that will speed up your Webpage.
It compensates for badly optimized pictures, or badly created scripts and much more.
Having said that if you do not know how to use it the module may cause some issues with your website.

It can be turned off on a per domain basis quite easily. To do this simply add a new line in your .htaccess file.
Add it towards the top of your .htaccess file.

Most sites already have a .htaccess file or you may simply make one with your text editor.

Then add it to the public root directory where your web page it's served from.

 It's likely your site already has one.

Open your .htaccess file with your favorite text editor and add this line:

 Modpagespeed Off 

That's it now save the file to your public root directory and you ready to go, Mod Pagespeed is now off. 


Reviews

Having a review of other users with the same concerns is more valuable than any advertising we could produce. We ask our users to submit reviews and list a few below.

You may as well submit your review on any of a number of independent sites such as those below. 


How to add a file/PDF to a Joomla Article 

Should you wish to add a PDF to a webpage/article in Joomla its not a good idea to use the standard media manger tool.

As Developers when we add a PDF to a webpage using Joomla, we use the JCE editor (Content Editor For Joomla) and its file manger tool . 

JCE is a free editor and most features are included. The file manager plugin is unfortunately one of the plugins you require a subscription to download. Do not fret though if your using Joomla this editor is excellent and does do most everything and is contentiously updated and improved. its a very active project. It included Iframe support, Media support and much more. 
If you have not done so download the file manager plug from the JCE site and install it. It's found under plugins once logged in the JCE site. 
Once you have that plugin installed and configured in your JCE editor your set and ready to go.

The Edit

Open The article you wish to edit. I'm actually using this article as a example.

Place the mouse courser where you want the text of the attachment article/PDf to be placed.

for example

 pdfHere IS A PDF EXAMPLE

filemanagereditor

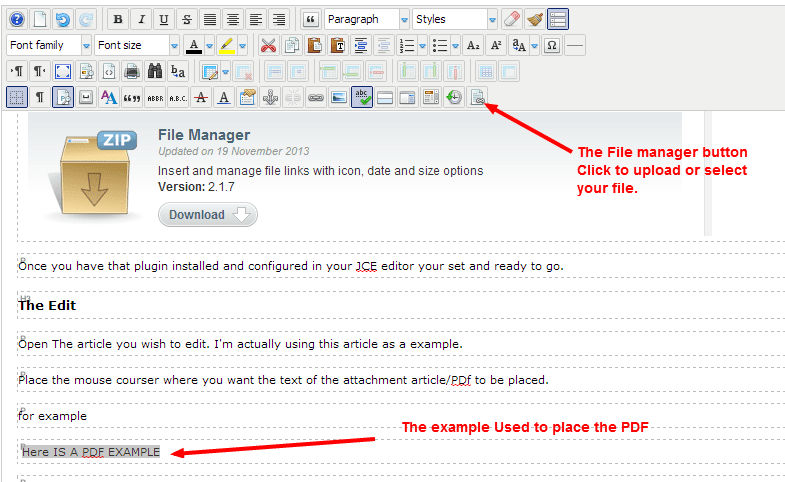
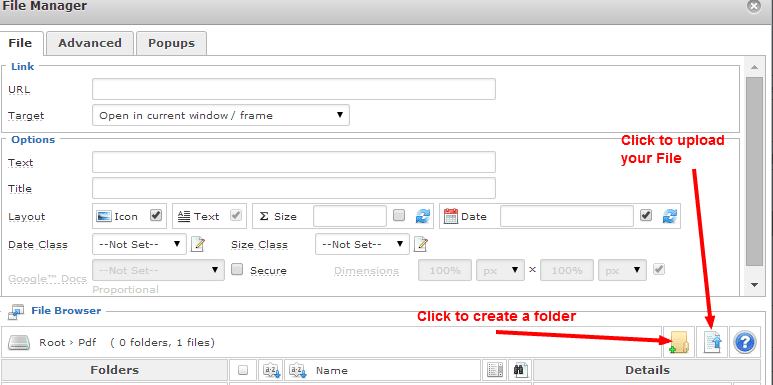
then click the file upload button as indicated above. Often the bottom is found in the bottom row - right. JCE does allow you to move it where you prefer.

JCE will now open a window to upload the file/pdf so you can place it where you wish. I always place PDF's in a folder named "pdf" just for simplicity. The JCE editor even provides the ability to create a folder on the fly. See below for example of teh the pop up when File manager button is clicked. 
Filemangerfileupload


That's it you now have a PDF inserted in your article. Just like above. 

Setup or Remove an Email In Outlook 2010

This Information provided from the Microsoft site HERE
or copy and paste the url below into your browser and click enter

Before you can send and receive email messages using Microsoft Outlook, you must add and configure an email account. If you have used an earlier version of Microsoft Outlook on the same computer where you have installed Outlook, your account settings are automatically imported.

In this article

About email accounts

Outlook supports Microsoft Exchange, POP3, and IMAP accounts. Your Internet service provider (ISP) or email administrator can give you the configuration information that you must have to set up your email account in Outlook.

Email accounts are contained in a profile. A profile is made up of accounts, data files, and settings that specify where your email messages are saved. A new profile is created automatically when you run Outlook for the first time. For more information about profiles, see Create a profile on the Microsoft site.

Add an email account when you first start Outlook 2010

If you are new to Outlook or are installing Outlook 2010 on a new computer, the Auto Account Setup feature automatically starts and helps you configure account settings for your email accounts. This setup requires only your name, email address, and password. If your email account can’t be automatically configured, you must enter the required additional information manually.

  1. Start Outlook.
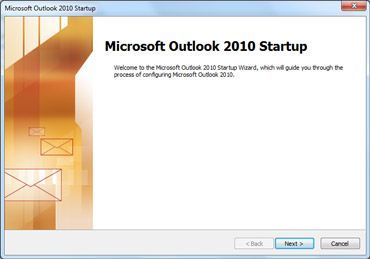
  2. When prompted to configure an email account, click Next.
ZA101865161

  1. To add an email account, click Yes, and then click Next.
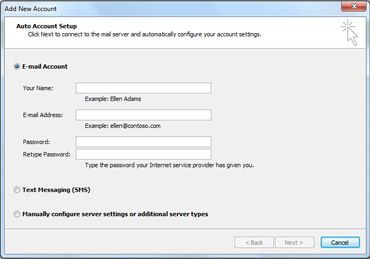
  2. Enter your name, email address, and password, and then click Next.
ZA101865166

If you enter an email address that ends with outlook.com or msn.com, you must use the Microsoft Outlook Hotmail Connector to add the email account. For information about how to add these kinds of email accounts, see Use an Outlook.com account in Outlook.

 NOTE    When your computer is connected to a network domain for an organization that uses Microsoft Exchange Server, your mail information is automatically inserted. The password box doesn't appear because your network password is used.

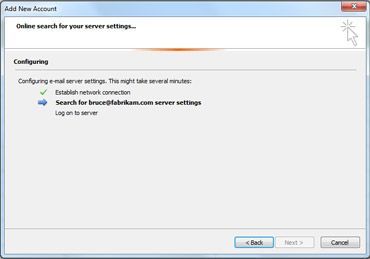
A progress indicator appears as your account is configured. The setup process can take several minutes.
ZA101865167

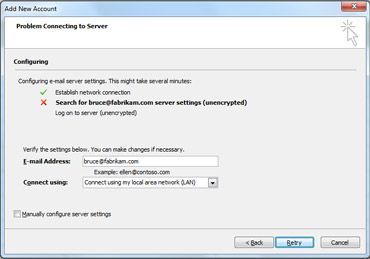
If the initial attempt to configure your account fails, a second attempt can be made using an unencrypted connection to the mail server. If you see this message, click Next to continue. If the unencrypted connection also fails, your email account can’t be automatically configured.
ZA101865171

Click Retry, or select the Manually configure server settings check box. For more information, see Add an email account by using advanced settings.

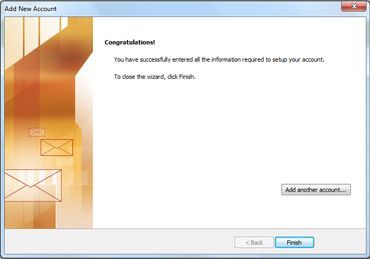
After the account is successfully added, you can add more accounts by clicking Add another account.
ZA101865164

  1. To exit the Add New Account dialog box, click Finish.

Add an email account in Outlook

Although most people add an email account when Outlook first runs, your first or additional email accounts can be added at any time.

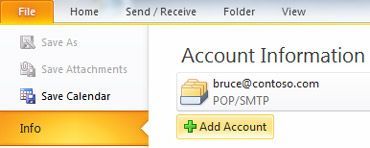
  1. Click the File tab.
  2. Under Account Information, click Add Account.
ZA101865160

  1. Enter your name, email address, and password, and then click Next.

ZA101865166

If you enter an email address that ends with outlook.com, or msn.com, you must use the Microsoft Outlook Hotmail Connector to add the email account. For information about how to add these kinds of email accounts, seeUse an Outlook.com account in Outlook.

 NOTE    When your computer is connected to a network domain for an organization that uses Microsoft Exchange Server, your mail information is automatically inserted. The password box doesn't appear because your network password is used.

A progress indicator appears as your account is configured. The setup process can take several minutes.

ZA101865167

If the initial attempt to configure your account fails, a second attempt can be made using an unencrypted connection to the mail server. If you see this message, click Next to continue. If the unencrypted connection also fails, your email account can’t be automatically configured.

ZA101865171

Click Retry, or select the Manually configure server settings check box. For more information, see Add an email account by using advanced settings.

After the account is successfully added, you can add more accounts by clicking Add another account.

ZA101865164

  1. To exit the Add New Account dialog box, click Finish.

If you added an Exchange Server account, you must exit and restart Outlook before the account appears and can be used in Outlook.

 NOTE    If your profile already contains a Microsoft Exchange Server account, and you want to add another, you must use the Auto Account Setup. To manually configure an additional Exchange Server account, you must exit Outlook, and then use the Mail module in Control Panel.

Remove an email account

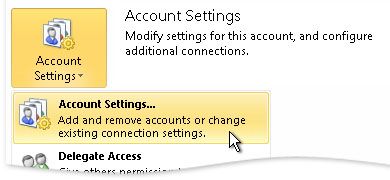
  1. Click the File tab.
  2. Under Account Information, click Account Settings, and then click Account Settings.
ZA101823870

  1. Select the email account that you want to remove, and then click Remove.
  2. To confirm removal of the account, click Yes.

To remove an email account from a different profile, exit and restart Outlook with the other profile and follow the previous steps. You can also remove accounts from other profiles by doing the following:

  1. Exit Outlook.
  2. In Control Panel, click or double-click Mail.

Where is Mail in Control Panel?

Mail appears in different Control Panel locations depending on the version of the Microsoft Windows operating system, Control Panel view selected, and whether a 32- or 64-bit operating system or version of Outlook 2010 is installed.

The easiest way to locate Mail is to open Control Panel in Windows, and then in the Search box at the top of window, type Mail. In Control Panel for Windows XP, type Mail in the Address box.

 NOTE    The Mail icon appears after Outlook starts for the first time.


The title bar of the Mail Setup dialog box contains the name of the current profile. To select a different existing profile, click Show Profiles, select the profile name, and then click Properties.

  1. Click E-mail Accounts.
  2. Select the account, and then click Remove.
  3. To confirm removal of the account, click Yes.


 NOTES 

  • Removing a POP3 or IMAP email account doesn’t delete the items that were sent and received by using the account. If you were using a POP3 account, you can still use the Outlook Data File (.pst) to work with your items.
  • If you are using an Exchange account, your data remains on the mail server unless you move it to an Outlook Data File (.pst).
Glossary

A | B | C | D | E | F | G | H | I | J | K | L | M | N | O | P | Q | R | S | T | U | V | W | X | Y | Z
^     A
A Record

Address Record. Maps a domain name (such as example.com) to a numeric address that computers recognize (10.45.54.231).

Admin Contact The name, address, phone number and email address of the person who administers the domain.
Advanced Settings Edit the files that are associated with the domain (A Record, CNAME Record, MX Record, and TXT Record).
Auth Code

The auth code is a unique combination of characters that is used to show verifiable proof of ownership of a domain. If you are transferring a domain to another service provider, you must supply the auth code to that provider to show that you have the authority to transfer the domain. The auth code can only be generated by the owner of the domain.

Auth codes must be 8 to 32 characters long and contain at least one number, one letter, and one special character.

AU Registrant Information

Registrant Name - (Required) Enter the legal entity such as a company, incorporated association, government agency or individual person; cannot be a registered business name or trademark.
Registrant ID - Enter the identifier of the registrant (for example, the business or trade license number) in the text box, and choose the registrant ID type from the drop-down list.
Eligibility Type - (Required) Choose the reason that you are eligible for the domain name.  The Eligibility Ttype must correspond to the Eligibility Name. For example, if you are using your company name to register the domain, then your Eligibility Type is Company. If you are using your Registered Business Name to register the domain, then your Eligibility Type is Registered Business, even if you are also a company.
Eligibility Name - Enter the name of the person who is eligible to register the domain.
Eligibility ID - Enter the eligibility document identifier in the text field, and choose the eligibility type from the drop-down list.  You only need to complete this field if the value is different from the Registrant ID, for example, when your are using a registered business name or trademark to make yourself eligible for the domain name.

Reason for change - Indicate the reason that you are changing the .AU Registrant information.

^     B
Billing Contact The name, address, phone number and email address of the person who handles the domain's finances.
^     C
CNAME Record Canonical Name Record. Allows you to create an alias for your domain. For example, you can make 'www.example.com' an alias for 'example.com' so that visitors can use either one to find your webpage.
Contact Privacy

A service that hides your identity (address, phone number, email address) when a WHOIS lookup is done on your domain name.

CVV Number Card Verification Value. A security code number on a credit card that is not part of the account number. On MasterCard and Visa cards it is a 3-digit number on the back of the card; on American Express cards it is a 4-digit number on the front of the card.
CED

Charter Eligibility Declaration. Required when ordering .ASIA domains to satisfy the requirement that at least one of the domain contacts (admin, billing, owner, tech) must be a legal entity in the DotAsia community. For Legal Entity Type and Identification Type, if you choose "Other" you must describe the entity type in the corresponding Type field; the maximum number of characters is 255.

Custom Nameservers

Allows you to register nameservers at the registry based on your domain name, for example, ns1.mydomain.com.

^     D
Domain Search Type any text here to obtain a list of suggested domain names, including their availability and registration cost.
DNS

Domain Name System. A number of interconnected computers that translate domain names (such as example.com) into the numeric IP addresses that computers recognize (10.45.54.231).

Domain Forwarding Allows you to redirect visitors to another website (that you own) when they type your domain name in their browser. Use the Masked/Not masked feature to determine whether or not the destination URL will be displayed in the browser address line.
Domain Manager Allows you to easily edit, renew, or upgrade your domains.
Domain Locking Domain locking is a security feature that prohibits certain changes to a domain. If a domain is locked, transfers and DNS modification cannot be made until the domain is unlocked.
DNSSEC Records

This section allows you to submit DNSSEC information to the registry, if DNSSEC is offered by your DNS provider. If you are submitting DNSSEC information, you must complete all of the available fields.

To add DNSSEC information

1. Click the plus sign (+).

2. In each of the fields, enter the information that was supplied to you by your DNS provider, and then click Save.


^     E
^     F
^     G
^     H
Hostname The domain name, such as example.com.
^     I
IP Address

Internet Protocol Address. A numeric address that computers recognize, for example, 10.45.54.231.

IDN Language Code Choose the language that is used in this International Domain Name (IDN).
^     J
^     K
^     L
Legal type
^     M
Mail Host The address of the computer that stores your incoming email messages until you retrieve them.
Masked Destination URL is not displayed in browser address line when domain forwarding is in effect.
MX Record Mail Exchange Record. Ensures that email that is sent to you is routed to the correct destination.
^     N
Name Server

A computer server that maps domain names such as example.com to their IP address (10.45.54.231). The name servers are automatically set when you register a domain, but can also be provided by your web hosting service.

NS Record Name Server Record. Cannot be modified, and are displayed here for informational purposes only.
Nexus

Required when ordering .US domains to certify that the domain owner is a resident or has a business within the United States.

^     O
Owner Contact The name, address, phone number, and email address of the owner of the domain.
^     P
Password Can be 4 to 20 characters, one of which must be a number.
Premium Names Desirable domain names that are offered for sale in the marketplace.
Priority A number assigned to the mail hosts in the MX record that determines how email should be routed.
Personal Names Domain Forwarding

Domain Forwarding allows you to redirect visitors to another website (that you own) when they type your domain name in their browser. There are two ways to do this:

  • Click Forward using domain forwarding service to specify the address of the destination website. Click Enabled to implement domain forwarding. If you do not want your website address to appear in the browser address field, click Masked.
  • Click Forward DNS to specify the IP address (A record) or hostname (CNAME).
^     Q
^     R
Registrar Tag

The Domain tag of the Registrar to whom you are transferring your .UK domain.

Warning: Once you change the Registrar Tag, you will no longer be able to access any services that you had with your current provider.

^     S
^     T
Target Host Used with domain forwarding to specify the destination.
TXT Record Text Record. Allows you to write up to 255 characters of descriptive text.
^     U
Username A unique identifier. Can be 4 to 20 characters, one of which must be a number.
URL Uniform Resource Locator. The domain's address that you enter in the browser address line, for example, http://www.example.com.
^     V
^     W
WHOIS A service that allows you to look up a domain and find out the owner's contact information (name, phone number, email address) unless Contact Privacy is turned on.
^     X
^     Y
^     Z